Guide for Beginners: How do I paint? Updated!
Many years ago I wrote a very short intro guide to painting and this is it's logical evolution.
I tried my best to anticipate the questions a beginner would have as well as adding in some things I wish i'd have known starting out. There are many links in this post. Use them!
Let's start by learning something about paint types.
Acrylic: The
"lightest" and most forgiving of the paints. Most acrylics are
water based meaning you can thin them with distilled water (Not tap
water). Acrylic paints have larger particles of pigment which causes them to look goopy if painted too thick. I cannot stress enough the importance of thinning to the proper consistency. For those airbrushing I recommend thinning acrylics with 90%
isopropyl alcohol as it helps them dry faster. Acrylics dry in about 30
minutes and cure in about 48 hours.
FAQ: what's the deal with Tamiya acrylic paints?
Tamiya paints are actually acrylic lacquers, that is an acrylic pigment suspended in lacquer thinner. You can thin them with either lacquer thinner, iso alcohol or a mix of both (which their ×-20 thinner is)
Enamel: The verb to enamel historically means to cover something
with powdered glass and then fire it to a smooth glossy finish. Modern
enamel paints emulate that type of finish. Enamel paints produce some incredible metallic effects if properly applied and buffed. Enamel paints are unique in
that they are oil based meaning they can be thinned with a wide variety
of turpenoid dilutants like odorless mineral spirits and lighter fluid.
This makes them ideal for washes and filter effects. Dry time is about an hour but curing takes almost a week.
Lacquer: The rough stuff. Lacquer paints are brilliantly
pigmented colors suspended in volatile organic compounds like
nitrocellulose. Lacquer paints are exclusively used in airbrushing and the
fumes they create are very dangerous. You should always wear a filter
mask and work in a well ventilated area when working with lacquers.
Dry time is very short at no more than 15 minutes and cure time is three to four days.
FAQ: Can I hand paint lacquer? Yes you can. You can also drive on 3 flat tires and bench press with a bruised rib. If you must do this to yourself you're going to need a product called Lacquer retarder. No I'm not making fun of you that's actually what it's called. This stuff slows down dry time enough to hand paint with lacquer.
Oil: Very slow drying paints which are used for weathering, washes, and filters.
FAQ: What is the best brand of paint to use?
Short answer for hand painters: Vallejo's Model Air range. It is good enough to recommend over all others. Stay away from "craft" paint and Tamiya's acrylics. They are not for hand painting.
Short answer for airbrush: Tamiya acrylics thinned with lacquer thinner. Absolutely second to none for basecoating. Gaia/Mr.Color are great for shading because you can thin the living hell out of them.
From the comparison we can see that hand painters will want to equip themselves with either acrylics or enamels.
Acrylics are a bit more forgiving but less color rich while enamels are
more vibrant and dry to a very hard shell. Which one you choose is up to
you, I've gotten decent mileage out of both so I can't recommend one
over the other.
For this guide I will assume that you want to start by hand painting so go ahead and gather the following.


 Here our parts are further broken down into their individual state and pinned up for painting. Note that even the joints are separated so their full range of motion can be painted.


Sandpaper and emery board. You need 600 grit paper and a "fine" board.
FAQ: I'm a manly man and have no idea what an emery board is.
It's a nail file. You get them in the beauty section at your local drugstore. Better yet ask your wife/girlfriend/sister. They'll know.

Paints and brushes. I'm using a mix of acrylics made for miniature painting and some assorted mid range brushes.
FAQ: Is the quality of my brushes important?
Yes. Don't buy cheap brushes, they will fray and generally be a pain in the ass to use.

A well palette.
Extra credit: make a wet palette.


Get your self a Tupperware, 2 dish sponges and some wax paper.
Cut the abrasive pad off of your sponges if they have one then put them in the Tupperware. Put a sheet of wax paper on top of your sponges and add enough water to moisten (not soak) them.
Congrats you've made a tool that art stores want to charge you 30+ dollars for.
A wet palette keeps your paint wet and makes it easy to pull more water into your mix to thin. When you're done painting you can also snap your lid on and keep your paint workable for several days compared to maybe 30 minutes.

Crocodile clips to hold your parts while you paint. If you don't have any and don't want to wait for shipping you can pin your parts with toothpicks and blu tack.

Primer.
Stay away from anything you'd get at wal mart.
I recommend a rattle can primer made for miniature painting or a graffiti can. Tamiya and Mr Hobby both make incredible spray primers but they are very expensive for how much you will waste from over spray.

Gloss or Matte Top Coat.
It's your call as to which finish. Again, Tamiya and Mr Hobby are awesome but uneconomical.
FAQ: Why is there floor wax in this picture?
Future floor polish is nothing more than clear acrylic and that makes it a great choice as a gloss top coat. You can even hand paint it.

And lastly a foam block to stick your clips or toothpicks into. You can buy these at craft stores in the silk floral section.
Start off by giving your parts a gentle sanding with your 600 grit paper and smooth them out with the emery board. This will prepare the surface of the parts for primer.
Now spray your primer and allow 2 hours to dry.
Put some paint in your palette and thin it about 60%
Your first coat should be heavy enough to cover the part in color without leaving any marks. If you are getting brush strokes then chances are your paint is too thick. Thin it down more and try again.

Now wait 30 minutes for your first coat to set. Your next coat should be thinned 1:1 paint to water and how many coats you do depends on how dark you want your colors to be. 2-3 is usually plenty and more than 5 gets too thick.
Here's our lovely spoon after just 3 layers.
When your parts have dried to an acceptable color, paint on a thin layer of future and you are done!
Id let the parts sit for a day or two before you assemble. This is very important, I can't count the number of times i've been impatient in wanting to see my finished work and paying for it by having to sand down, strip, and repaint half my kit. Just be patient.
You can detail up your kit by using a small brush to contrast paint raised details. A frame will look great in base German grey and silver.


Faces take a steady hand to detail but it's nowhere near as daunting as you may think.

Before

After
More FAQ:
Do I take my kit apart to paint it?
Yes you do. It is very important to paint your parts individually so that your kit doesn't stick together. First break your kit down into it's Sub Assemblies. Most kits have 7 of these. The torso, head left arm, right arm, left leg, right leg, and accessories.

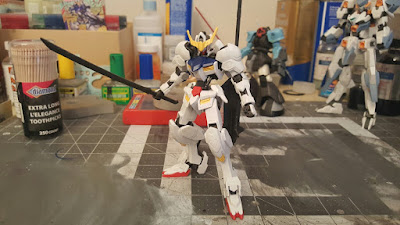
Here we see Barbatos broken down into his major Sub Assemblies. This will be the first step for painting after you build.

I'm forgetful and i'm worried that once I prime my parts I won't remember what color they are supposed to be painted.
Use some toothpicks and masking tape to make yourself reminder flags!


This little life hack has saved me a lot of grief when working with large batches of parts.


Awesome guide! Thanks for writing in such detail!
ReplyDelete